Friday, May 11, 2007

Stamp your Mother's Day card(s)!


Hello -
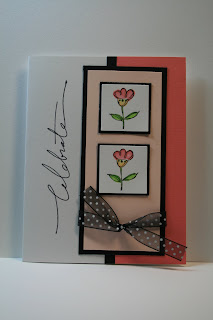
This is a quick and simple card to reproduce! I used the Doodle That from SU!, the 1 1/4" and 1 3/8" punch by SU! to punch out the squares for the flowers. I used blush blossom, cameo coral, basic black, whisper white for cardstock colors. For markers.. cameo coral, so saffron and certainly celery.
You can customize this card to be for any occassion - get well, anniversary, birthday - and now that I am looking at it...Mother's Day! I think I have just found my card - Ya-hoo.
So..for those who may be a little behind for making Mother's Day cards - you have two days to stamp a card. I don't want to hear about anyone buying one. This is a quick and simple enough card to be reproduced. Look around the stamp room...you have punches or an x-acto knife you can use to cut the squares.
So go forth and stamp!

Sunday, April 29, 2007

Stamp Camp Fun!


Hello everyone ~
April 28th was Stamp Camp! It was a fun and relaxing time.
This is not the actual card that was made. This was my show and tell. I don't do this usually (only because I don't think to do it!), but it was fun to show an alternative. The base of the card was found in the Target $1.00 spot. I used the chocolate chip and tempting turquoise colors from Stampin' Up! I also used the polka dot stamp from Polka Dot and Petal stamp set, also found in the Spring Mini Catalog. I used the 3/4 " punch to punch it out and it fits perfectly as the center of the flower. I did use recycled rubber to pop it up.
On the edge of the flower petals is dazzling diamonds.
Here is the great part. If I did not want to use the note card size (smaller than an A2), I could cut the note card in half and mount it onto an A2 size card. The back of the card is chocolate chip and the tempting turquoise polka dots as you see on the far left of the card. I could basically have two cards from one note card. There are 8 notecards and envelopes in this pack for $1.00 (or 16 cards if you cut them in half). There was another color - black, white and red. But it did not trip my trigger at the time I was looking so they were left behind. I know a couple of you from Stamp Camp went to Target to find them. For the rest of us...we may be out of luck, or have to wait and see if Target gets another shipment.
This was an easy peasy card!

Wednesday, April 18, 2007

Polka Dot & Paisley


This card was inspired by Debbie Olson - she is a very talented stamper and very inspiring (obviously). I used Stampin' Up! Designer papers found in the Spring Mini Catalog. The green polka dots is on the opposite side of the bottom sheet with the flowers on it. It was a quick card using the Designer Papers.
I used Pretty in Pink, So Saffron, Tempting Turquoise, and Old Olive.
I used a little Bling for the center of the flowers. I adhered these crystals with Dazzling Diamonds.
I had resisted purchasing the Ticket Punch, but am glad I did now. I did try and use a 1/4" hand held punch, but it took my a while to align things up. With the Ticket Punch it has a guide built in so you can turn it over and make sure the paper is in the guide and voila!

Sunday, April 8, 2007

Dollar birthday present


I was perusing in the local craft store - Pat's, when the dollar stamp bin reached out and grabbed me - literally. I was innocently walking by when the stamps had linked themselves together long enough to reach out and grab my arm. This image stood out to me. I immediately thought of quick and easy. Before I knew it, it was in my basket! I used Prisma color pencils and gamsol odorless blending solution. After that I added Dazzling Diamonds (Stampin'Up!) to the bow, dots and slashes on the purple section. The 2-way glue pen from Stampin' Up is what I used to adhere the glitter to the card. The "Happy Birthday" is a hero arts stamp which I stamped in black and mounted on Pale Plum and then Perfect Plum from Stampin' Up! The Background paper is from a Mat Stack I picked up at Jo's. It is called the Glitter Stack and you cannot really tell, but the white dash lines have glitter on them.

Baby Card and Crate Paper.


I know someone who recently had a baby, so I wanted to make a card. I really like this set, Little One, from Stampin' Up!, but it has since retired.
I used some scraps from the Crate paper I actually cut into. I used a strip for the border, and the second sheet to mat the sleeping baby on.
The card base is Barely Banana. I used Black Staz-On ink for the baby image and the sentiment. I then used Stampin' Up! watercolor pencils and blender pen.
I stamped, watercolored and cut out the giraffe. I used a pop dot so I coudl add dimension. I considered this my embellishment. This is an original of mine. I did have a hard time deciding what color to use on the diaper cover and shirt. I needed a color to match the patterned paper and have it be neutral.
I think this card turned out okay. I just need to send it out now!

No stamping today

Okay, no stamping today. I used those yummy Crate papers. I used barely banana for the scalloped oval. The brown is from the flip side of one of the patterned papers. I put the brown paper through the printer and used the SU Font CD.
I used the Stampin' Up! small slit/oval punch. and chocolate grosgrain ribbon.
I thought this would be a great card to give from my son to his grandparents.

Sailboat - Simple Design


Simple design like yesterday's post. I think there is something missing. I plan on putting a sentiment on the front, but I wanted to leave it blank so I could grab it and use it for whatever occasion I needed it on my son's behalf.

The patterned paper is by PaperLoft again. The sailboat is from ToyBox by Stampin' Up!. I used colored pencils to add color. I thought about adding ribbon, but thought it would be too much.

Hmmmmm...