Saturday, May 31, 2008

Saturday Stash

I thought the title appropriate! I have talked about using "stuff" I just
"had to have" and then hoarded it for that "perfect project". That's a log of "quotes" - LOL. I picked up this sheet of tags by KI Memories at a scrapbook store in town. They were on clearance and I have to admit I probably have had this sheet for a year or more (but no more than two years!). I got it out and was determined to use a tag from it.
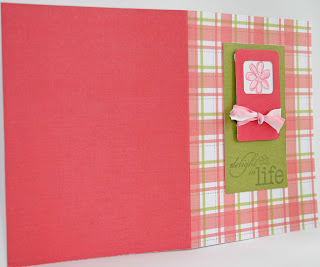


Now, I also had these pre-printed cards from DCWV that, yes, I have had for a year plus. You know, you walk by and the wheels begin to turn and you have all these ideas you can do with these cards. Well, I brought them home and they sat. No time to give to these cards. I am showing the card open because my wheels began to turn again...I could cut the card in half and make two cards out of one, or use the berry color for a layer that I know would go perfectly with the patterned part of the card. But, I showed mercy on this card and have left it intact. I did cut into my DCWV mat stack, yes that I have had for a year plus :), and used it as a layer.
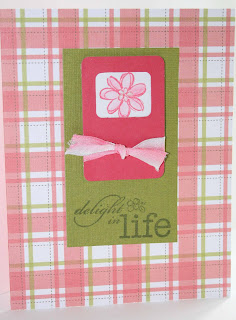

With all of that being said, you see the finished card. I used
the retired Stampin' UP! set Delight in Life. I stamped the flower on White in Rose Red ink. I used my blender pen to color it in. You can't really see, but I added glitter to the middle of the flower. I mounted the KI Memories tag onto the white square. I had some pink/white ribbon which "tied" in well with the colors - no pun in tended.
The green cardstock is from DCWV and I stamped the sentiment in Artichoke. Added pop dots behind the pink tag and I was finished! Quick, simple and cute - I must say myself.
So, go get something out of your stash and create something.
I would enjoy hearing about what you did and send me a link so I and others can enjoy your creation! You can do all of that in the comments section.
Enjoy your day!

Thursday, May 29, 2008

Another - its a great size!


I wanted to post this card. I posted this last week or so. This was my brother and sister-in-law's anniversary card. I used American Craft ribbon because it had all the color combinations in it. Also this was a color challenge I participated in.


With that scrap of ribbon, I made a 3x3 note card.

I used the same colors as the full size card, and notice the same "template". What may be difficult to see is I used glitter on the cupcake.

I have the sentiment already on the inside, so it is set to go. I can include this on a gift, give it is a birthday note, or attach it to an A2 size and make it a full size card.

The stamps are made with photopolymer and were $1.00 at a store. I am finding that dye ink - like Stampin' Up! classic ink does not do well on the photopolymer material. When I stamp, it gives it a fuzzy image. It reminds me of the ink beading up on the material.

When I used Stampin' Up! Craft ink -pigment ink - it "adhered" more to the photopolymer material and stamped a much clearer or crisp image - like you see the "happy birthday".

Wednesday, May 28, 2008

Wednesday Update

I thought Wednesday would be a good day to make it a "Wednesday Update" day!

Here is my update for this week....I am embarrassed to say that I sent out my Stampin' Up! May newsletter earlier today. I do realize the date, and because of this you can expect to see my June Stampin' Up! newsletter at the beginning of the month! Yahoo! Little steps, little steps right?!

You can visit my Stampin' Up! website and view the newsletter, projects, specials, etc. at:
http://www.inkgenuity.stampinup.net/ - enjoy!

Dee Dee

Great size to begin with


Well, I put into service this gradutation card for my husband's nephew's graduation party. Everyone liked it, but I cannot take credit for it. My upline, Jan Wakeland sent it to me.
Thank you Jan for saving me on this!
I had nothing prepared and it was a last minute, put-together graduation party.


Then I showed you the inside of the card. I did add a sentiment to it...and this cute Thanks card was inside. It uses the SU designer paper on it. I decided it was too feminine for a male to send out, so I selfishly kept it!


Here is my attempt at getting fancy with my photography, and you can see the Thanks card. It measured approximately 2.5 by 2.0.

Now here is where I get steamed with myself....I had the next step cropped and ready to go..and somehow I lost it in the "blackhole" of the computer memory. UGHHH.

What I did was take a 3x3 piece of Chocolate Chip cardstock, wheeled a flower pattern over it, it is a wheel and I wheeled over SU Craft white ink and then rolled it over the Chocolate Chip cardstock. It matched the flowers on the DSP (designer series paper) great!


Here is the finished sample. You can see the white flower background. This is a perfect size for a quick thank you. Some times I feel if I have an A2 size card I need to write more. With this size it is "just enough". Now....you could add this to an A2 size card. Don't think you can't use something that started out small...you can add to it!

I purchased the 3x3 notecards that are in the SU Idea Book & Catalog. I need to buy more of them!

Thanks for stopping by.

Dee Dee

Sunday, May 25, 2008

Happy 16th Birthday!


This morning I was able to get up and begin AND finish a card for my niece that has turned 16.
A couple of posts back I challenged you to stop hoarding and begin using what you have. I also challenged you to swap "stuff" with friends so that what was old to you was new to them and vice versa. Well, I did that. My friend bought this matstack from Target a while back. It already has adhesive on the back, so just peel and stick. Convenient, but scary if you are about to sneeze as you place this. This piece of paper already had the designs on it. I only stamped a flourish over the Cameo Coral cardstock piece that says "Happy 16th Birthday". I computer generated that sentiment because I did not have anything that seemed to work with how I wanted it to look. I used Cameo Coral and Tempting turquoise as the two layers and the base of the card. I sponged Chocolate Chip on the Cameo Coral square and card itself, and on the Tempting Turquoise square. I then stemped the flourish with Close to Cocoa - stamping off one time. I used Stampin' Dimensionals on the back of the Tempting Turquoise to stand it out some. Since I was going with the Shabby Chic look, I tood the Stampin' Up Cutter distressing tool and roughed up both the Cameo Coral and Tempting Turquoise squares. It is difficult to see in this picture. Yes, I picked this font color because it matched the card!


Here is the Stampin' Up! Cutter tool kit. I really like it.
It is all linked together by a ball chain so you don't have to worry about losing any of them. It has the distressing tool (that is the gray tool), a scoring blad, rotary cutter, and a perforating tool. I love how Stampin' Up! put pictures on the one side of the tool..for us visual people. Everything opens up like a pocket knife. You don't need to worry that your little one will "slide" forward the rotary blade. Very nice tool to have.

Off to get ready for a picnic/graduation party with my husband's family. Remember that Graduation Card I posted last week?? Well, it is being put into service today! I have a couple of weeks before my niece graduates to come up with another one. Hopefully, I will work ahead and not wait last minute.

If you are wondering...I am learning how to put text on my pictures so I can be in compliance with Stampin' Up! As you can see, I have not figured out how to make the text bigger so that it can be seen easily, but it is there.
I am also playing with my camera settings. I used natural light with no flash. I also played around with the ISO settings. You can see a shadow on the picture, but I think the card looks much better in natural light. I have not figured out what I am going to do about taking pictures if I am up early or late. Prime daylight time happens when I am in my Cinderbox at work!


Saturday, May 24, 2008

Stamp Room

Hello -

I did not post on Friday. I took my son to see Thomas the Tank Engine that was close by.
I was hoping to do some stamping last night, but I "hit the wall". Hopefully I can post a couple of pictures of the day later on.

Right now, I am doing a needed cleaning of the stamp room. Seems to be happening more often as of late. When my brain is in the mode, I do with it. I have some stuff that is just outdated! It was in at the time, but now it is "out". Since I am doing my best not to buy and trying very hard not to hoard, I hope to be "in" for a change. I suppose that would be a phrase I would use.

Anyway, I hope to be able to post a card or so later sometime this weekend. I always have ideas going around in my head, but never enough time to create them. I am sure there are many that feel this way.

I am currently printing out the next class as we speak. Look for more information on that coming soon.

Back to sorting and either trashing, donating or selling :)

Wednesday, May 21, 2008

Graduation card idea

Over the weekend I received this cute 4x4 card from my upline Janet Wakeland. Actually, the thought ran through my mind...Graduation is coming up! I have a niece who is graduating next month, so it reminded me to begin working on a card...you know not like what happened with my brother and sister-in-law's Anniversary Card! This card is cute, quick, and is non-gender specific. All the images are from Stampin' Up! Stampin' Up! does make the large star punch as well as a small size as well. The two punch sizes complement the Star Jumbo Wheel which was used on the River Rock cardstock. It is difficult to see in the picture.


Inside the card was this smaller card. It measures 2.5 x 2.5.
It is blank inside. Something the Graduate could write in and hand to the recipient.
When using card sizes other than an A2, you have a couple of options. The 4x4, 3x3 sizes I would either hand deliver them - like taking to a party, or seeing that person on their birthday, or I would put the card in an A2 envelope to mail. Yes, I would put the 3x3 in an envelope and then put that inside an A2 size envelope. A 3x3 size cannot be mailed.
A 5x5 square or larger, you may already know this. It can be mailed, but will need extra postage because of its size and shape. The automated letter sorter, cancellers, or whatever else the machine does, was not designed for this size or shape.
Something to think about for your mid-week!
Colors: Blue Bayou: cardstock, ribbon, ink; River Rock cardstock and ink.
Stamps by Stampin' Up!